
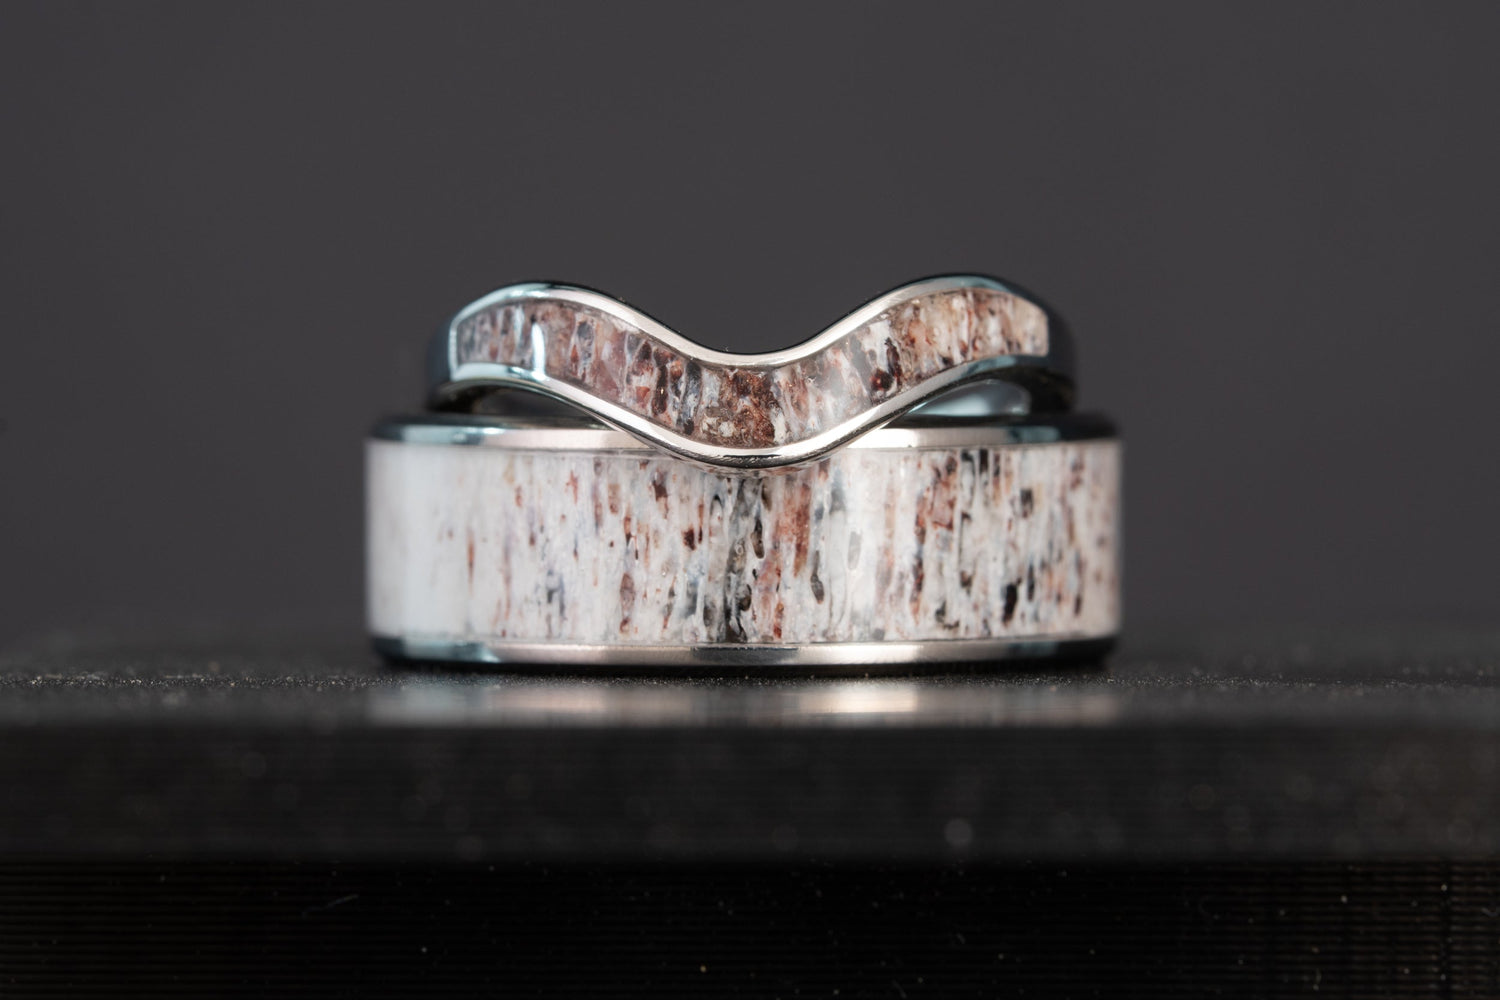
We cut into the nicest mount we've seen in our workshop for two elk antler wedding bands, then we made it whole again.
Hey, this is Ben, owner of Honest Hands.
If you'd told me when I started this shop that I'd be laser scanning an elk antler off a customer's mount, I wouldn't have believed you. But I've learned over the years that custom rings and creative problem solving go hand in hand.
Most of the time, the challenge is the ring design. For these rings, the riddle was how to cut an inlay without altering the look of the source material. Shawn and Joanna dropped off their prized possession, an elk mount from one of Shawn's once-in-a-lifetime hunts. The mount is impressive, and one of the nicest we’ve had in the shop, with a full rack, already framed up for the wall.
Getting antler for a ring inlay usually means cutting into the mount itself. For a hunter, that’s a real trade-off. A mount like this comes from one hunt, one animal, and maybe years chasing the right bull before you ever get a shot. Cut into it, and it’s gone for good. Shawn and Joanna wanted the ring, but they weren’t willing to lose the mount to get it. It was time to get creative.

I started by cutting a few-inch section off the main beam of the right antler, small enough that the rest of the rack would hold its shape. Slicing it open exposed the marrow, the porous pattern inside the bone that gives an antler inlay its color and grain. I sent that piece to my buddy at IPF Racing for laser scanning and replica printing. For a car guy, it was his first time scanning a piece of bone. The finished product was an exact replica of the antler piece we cut, but it shone like a brand-new penny.
To create a seamless reconnection between the halves of the antler, I lightly superglued the brass piece in place and used it as a guide for my drill to form a sort of bayonet mount that would join the two pieces together. Then we ran a metal rod through the hole, locked it in place, and epoxied it. The mount looks seamless again, with a clean brass band adding an unexpected artistic touch. We kept Shawn and Joanna's mount on our workshop wall while we worked on their ring set. We got to experience firsthand how the brass's subtle glint elevates the mount from a centerpiece to a conversation starter.

The next challenge was setting the inlay in two different ring shapes. Shawn’s band was machined, cut for the antler inlay, and sandblasted clean. Joanna’s shank was cast instead of machined. It needed to follow the curve of her engagement ring rather than sit as a plain circle. That’s what makes the two tell one statement on her hand instead of two rings crowding the same finger.
Once the casting came back and the sprue (excess resin) was cut away, the antler had to be shaped to match it. That meant wrapping that same irregular curve. I 3D printed a test insert to use as a cutting guide. Then clocked in at the belt sander, thinning the antler down to fit the contour. This step requires careful, high-precision work with no room for shortcuts.
Back at the shop, Shawn and Joanna picked up the mount and the finished rings together. Joanna’s antler came out pale and marbled. Shawn’s came out dark. Both inlays were cut from the same few inches of bone. One material, two entirely different looks. That’s what makes a shared material such a strong choice for two people building rings together, even when their styles pull in different directions. The colors and grain can go their own way. The pieces still belong together, because where they came from never changes.
Watch the full ring builds, mount repair, laser scan, and final reveal in the video below.

Honest Hands' Workbench Ring Designer starts with whatever material, yours or ours, that sparks something in you, whether that's connection, adventure, or a memory worth keeping close. From there, you're in control of every detail: metal, inlay, engraving, you name it.
Not sure if what you're picturing is even possible? Bring it to us anyway. Figuring out how to build something we haven’t seen before is half of what we do, and it shouldn't be the reason you don't let your creativity run wild.
Start on the Workbench Ring Designer, and we'll help you build the rest. Want to start the conversation instead? Reach out to us here.


Leave a comment
This site is protected by hCaptcha and the hCaptcha Privacy Policy and Terms of Service apply.